un-master

Group: Members
Posts: 19
Joined: April 2007 |
 |
Posted: May 22 2007,05:22 |
 |
Hi, I have been going through the various remastering possibilities, but they are buried 300 posts down starting about here. I have everything I have done documented fairly well, and will try to post a how-to once I get the last few things worked out. Thanks to meo, juanito, loupdesteppes, roberts, ^thehatsrule^ and others for breaking this ground first for us!
Here's my scenario. I want to remaster DSL, and really remove almost everything except a few network apps. No X, no browser, etc.
This is the general path I have started on, using DSL 3.3 syslinux (Should I be working with the embedded version? I am needing to eventually compile a kernel, the method I am outlining here seems to work for that. roberts I think I saw once that you said you worked with a Frugal HD install for remastering).
I am booting from CD with the TORAM option, then moving the running system to a chroot environment, and mounting /proc. I am doing nearly all of this by command-line. Using the dsl-dpkg.dsl extension, I am adding and removing applications. I then exit the chroot, unmount /proc and them use mkisofs to generate a fresh ISO.
These steps were done using VMware in Debian, most of them should work in Windows or other Linux distros (should I be starting with the .vmx version?)
1. Create two partitions in VMware (or a real disk, if not using VMware). I am using 6 gig (that's much larger than needed) and 1 gig for swap. Create an ext2 partition in the large one, Linux Swap in the smaller one. You can use cfdisk/mkfs in DSL, or boot it to any Knoppix/gparted live disk you are comfortable with. If you partition and format the wrong drive you will be unhappy, be careful! Mount the drive read-write:| Code Sample | | mount -rw /dev/sda1 /mnt/sda1 |
2. Create three directories, change the paths as appropriate for you. the /source dir is where we will chroot in, to customize it, and the /newcd dir is where we will create the new ISO:
| Code Sample | mkdir /mnt/sda1/source
mkdir /mnt/sda1/newcd
mkdir /mnt/sda1/source/dslstuff |
The dslstuff dir is optional, and only because I later put the .dsl extensions there to be manually run in the chroot environment. I am on a slow connection, and it was beneficial to save them elsewhere locally and FTP them over. You could also wget them directly from ibiblio.org I am sure. I did this too many times on a slow connection, I soon preferred to have them stored locally.
2a. OPTIONAL: Enable sshd from the DSL Control Panel on the desktop(because I was using local FTP and SSH) to do all of this from another machine. Otherwise, all of these commands can be typed in locally. If you are using SSH to make the connection, you should probably change the root password with the command: passwd from a root terminal window. You can also start SSHD and generate the initial keys from the command line with:
| Code Sample | | /etc/init.d/ssh start |
3. Create chroot and mount /proc:
| Code Sample | cp -Rp /KNOPPIX/* /mnt/sda1/source
cp -Rp /KNOPPIX/.bash_profile
/mnt/sda1/source
chroot /mnt/sda1/source
mount -t proc /proc proc
cd / (now / is really /mnt/sda1/source)
|
NOTE! HERE IS A BIG QUESTION I HAVE ABOUT THE PROPER WAY TO MOUNT PROC! I have seen this two ways, ending with proc and also ending it with /proc. Both ways seem to work, which would be more correct?
4. We need to get our DNS working in the chroot environment, I know that mine needs to be 192.168.0.254 so I edit /etc/resolv.conf with vi to make the change. You should be able to ping yahoo.com and get replies.
5. Move/copy/FTP/SCP the dsl extensions you desire to /mnt/sda1/source/ directory. If possible, it may be easiest to do it from the DSL extension control panel. However. I don't think that would really make them install in the chroot. I would run them manually from the SSH connection like this:
| Code Sample | cd /dslstuff
ftp <IP-of-lmachine-with-the-files-on-it>
login/password
bin <enter>
get dsl-dpkg.dsl
quit |
6. Install the extension:
| Code Sample | | mydsl-load dsl-dpkg.dsl |
It would load the extension, but also gave an error about "cat: root/.desktop-No such file or directory". I think this was because I was doing it via SSH instead of the local desktop. It works, nonetheless.
7. Now the fun part, adding new things! Just run dselect and press enter on "Choose Access Method To Use".
Press enter again on APT and it will ask you if you want to overwrite it. Tell it NO!
Next hit U for Update, it should be updating from the archive/Woody repository.
Once it is done, you can wander through dselect and add programs (and their dependencies). If you are comfortable with apt-get from a command line, you can exit dselect and upgrade that way. Dselect's main use for me is an easy to get the apt-get repositories set up correctly.
We are done adding things, we want to exit our chroot environment and umount /proc. Before you are really done, you will probably want to learn about apt-get clean, and removing some temp files, but let's go on for now. There are two important steps left, generate the Knoppix image, and then incorporate it into the ISO image.
Here is an important part of this how-to, and how all KNOPPIX disks work! the KNOPPIX image is one big chunk, that contains about all of your running operating system. It needs other pieces inside the ISO image to boot it up. These are all combined together into one big file, that is the ISO image. The ISO is what we (usually) use to burn a bootable CD. We need to replace the KNOPPIX image in our existing ISO with our new one.
First, let's generate the KNOPPIX image. We exit our chroot environment and unmount /proc:| Code Sample | umount /proc
exit <enter> |
Now, we need to generate the KNOPPIX image, pointing to the /mnt/sda1/source directory that we have been changing everything in, when it was our / direct while chrooted:
| Code Sample | | mkisofs -R /mnt/sda1/source | create_compressed_fs - 131072 > /mnt/sda1/newcd/KNOPPIX |
It should crunch away for a while, and you should have a nice new KNOPPIX image in the /mnt/sda1/newcd directory.
NOTE: the above MKISOFS command was edited 5/22/07. If you double the blocksize to 131072 you can disassemble the original DSL image, then assemble it back to 49MB, instead of 112 MB.
Now, to incorporate the KNOPPIX image we have created into the ISO file? You can do it with more command line things, but I chose to use an easy GUI way. I chose to use ISO Master, from http://littlesvr.ca/isomaster to do this. I know that there are Windows programs to do this as well, but I do not have any Windows machines here.
With ISO Master, you point it to the original ISO image (probably named current.iso for DSL), and hit File Open. The lower half of the screen shows the (temporarily available) contents of the ISO, the top half of the screen shows local files. We have to move our KNOPPIX image out to the machine that has ISO Master on it, so move/copy/FTP/SCP it over to there any way that you like.
In the lower half, we see a directory named KNOPPIX, and the only thing inside it is the original KNOPPIX image. We double click on the KNOPPIX directory, use the menu choice to Remove, then Highlight our new KNOPPIX image above and choose Add. It's easier than I make it sound, here is a screenshot: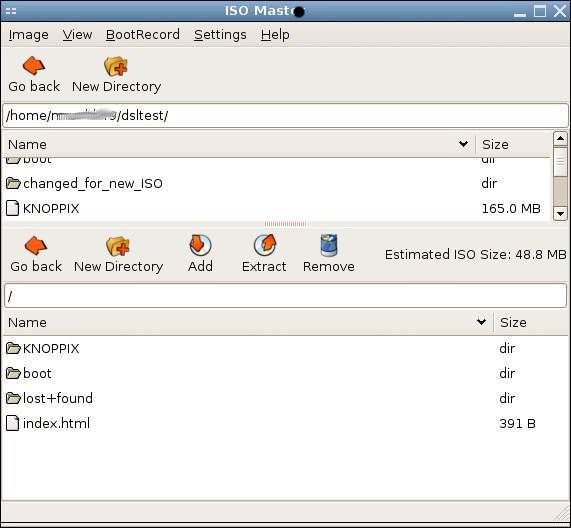
The KNOPPIX directory in the bottom half contains the KNOPPIX image, open it, highlight the KNOPPIX image, and hit Remove. Highlight the one above, and hit Add.
There is a choice for Image -->Save As, and you can rename the final ISO to whatever you want. Burn, Boot, and enjoy.
Let me know any improvements to this, I posted this late at night, and there will surely be typos at the least. In the long earlier thread, I worked with moving it all to Debian Stable, compiling new kernels and more. This is the basic remastering method that I have gotten to work, except the MKISOFS command needs something more, to make the image smaller.
thx
EDIT: 5/23/07 changed MKISOFS command to stop making a KNOPPIX image double the size it should be.
added:| Code Sample | | cp -Rp /KNOPPIX/.bash_profile /mnt/sda1/source |
to the chroot section. X will not start otherwise.
|


